In this article we will look at lists, leads, & list management in more detail, including dialler timezone management, data penetration and how lists feed into your dashboard and outbound calling report. It is extremely useful to have read the Understanding Outbound Dialling help guide before this lesson.
List Page

Here you can see all lists you have active, the last call time, the campaign the list is attached to, the number of dialable leads, and the total leads amount in the list.
The icons are:
Edit List, Upload Leads to List, Download the List, Reset the List, Delete the List and Contents
Adding a New List & Uploading Leads
To automatically Dial Leads, you must create a new list and upload leads. Click on “Lists”
 Click Add New List, name your list and click save.
Then click “Upload Leads”


Here, you can select a file, it must be .csv format, telephone numbers must be without the dial prefix. So for the USA leave off the 1. For the UK, you can leave on the 44 or 0 on the front of the number
You can have multiple columns of data, and the columns can be in any order, below is a good example:

Browse to your CSV file with leads in, select your target list which is the list you just created.

Select your countries dial code.
Select if you want to use our Free TPS filter, to remove any leads which are on the UK TPS (do not call) list.
It is generally recommended to select the lead duplicate check.
Click submit
You will then move to the next screen, where you can select which columns in your sheet line up with which field.
Line up the fields
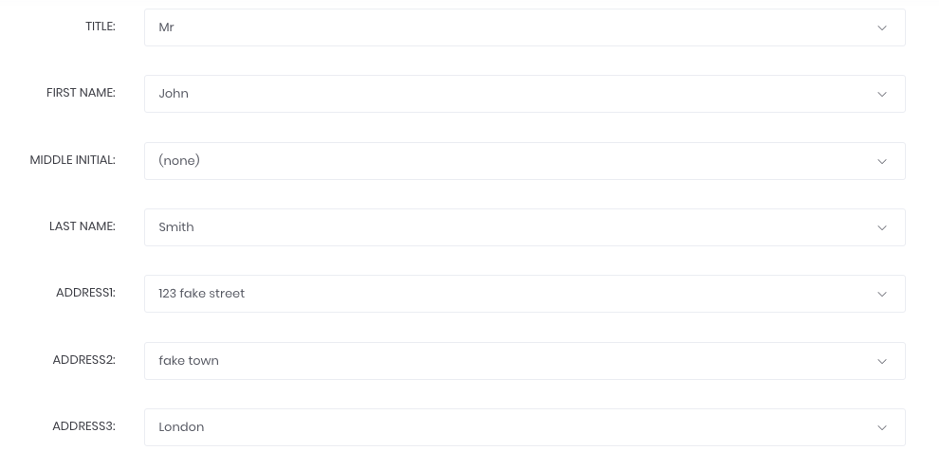
Then click Ok to process. Your leads will be inserted into the list.
When your file has been uploaded, you will receive the result like this

Your list will be allocated to your first campaign, but if you have multiple lists/campaigns, you can edit the list and assign it to a different campaign. In the below example, we can see this list is allocated to My First Campaign, and there are 50,000 dialable leads.

Resetting Your List
When you have ran out of “dialable leads”, you need to reset your list. You need to press the reset icon , the most popular method is to wait until you have ran out of dialable leads, and reset the list manually. 
Alternatively, you can setup Auto List Reset within the list by clicking the pencil icon to edit the list


List Time Zone Management
If you edit a list, you can look at the detail of the time zones within the list

If you set your Allowed Call Times in the campaign settings page for example to 12pm – 9pm, it will not allow a lead to be called outside of these times in the leads own timezone, so in the above example, if you log in at 11am GMT0, these leads will not be called.
This is particularly useful for the USA, and call centres operating in a different country to the customers.
Data Penetration
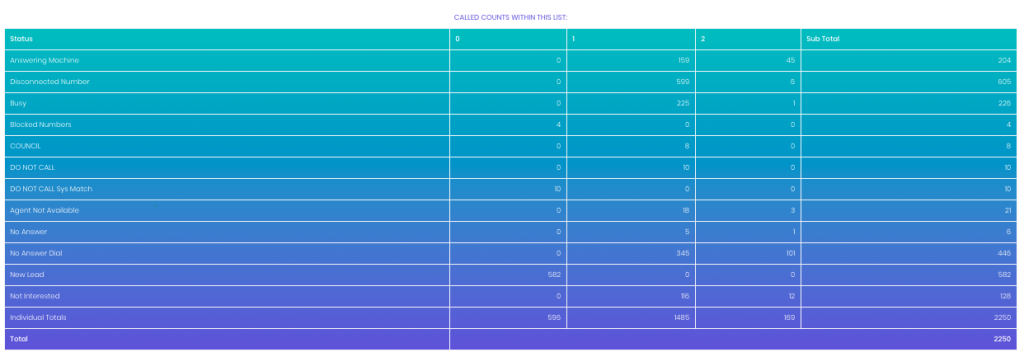
After clicking the edit icon on the list, in the list detail you can see the “Called Counts Within This List” report
Any leads in the “0” column have not been called yet at all, for example there is 582 leads with the New Lead status.
In the column “1” we can see the leads which have been called only once. e.g. 159 answering machines, and 345 No Answers
In the column “2” we can see the leads which have been called a second time, e.g. 45 answering machines, so that means on the first full call of the list there was 204 answering machines, now 45 of those answering machines have been attempted a second time, leaving 159 still to call for the second time.
This report gives you a idea of how “penetrated” your lists are, eventually your list will be unproductive to dial e.g. you will always be hitting no answers and answering machines, and your staff will not be busy.
List Performance & Reports
Understanding your list performance, and naming your lists correctly with recognisable and organised titles is important for good dialler management.

This report is available on the dashboard, here we can see how many sales we have from each list, and the conversion rate of how many calls it takes to get a sale.
Outbound Calling Report
If you navigate to the outbound calling report by selecting “All Reports” in the left hand menu and then filter by the lists you want to see the results for

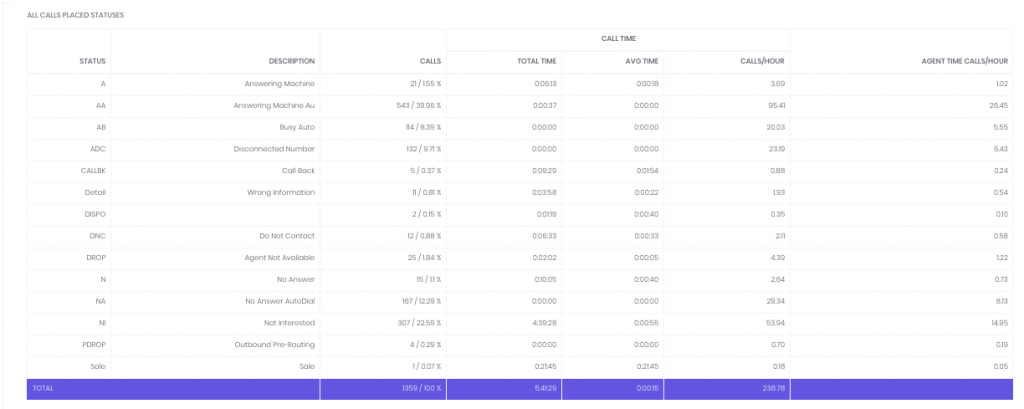
You can see the performance of the list, as shown below, e.g. you can see that day you have called 227 voicemails, (37.9%)
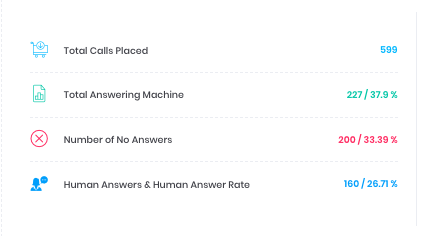
You can also see a more detailed breakdown of the statuses in the list that day.
If you wish to learn more about reporting, check out this help guide Lesson 6 – Reports Explained
